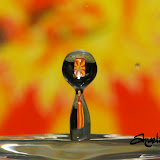
I've been reading some articles in forums regarding water drops photography. Some have claimed that it's hard and some claimed that it's easy. I got curious about it and found myself contemplating on trying it out.

First and foremost, I had to read a few sites, forums, blogs, and tips on how to actually do it. You can try to Google it by searching for "water drops photography" and sure enough you'll find lots of links you can refer and read about this topic.

So, last night, I had the courage and confidence to try it out. As we were eating dinner, my head was wandering around the kitchen looking for things I could use for this "project". I can't help it. I was too excited to do it.

Basically, here are the things needed for a simple water drop photography setup:
1) A container. Look for something that has a wide mouth and is transparent. Preferably those cooking glassware mixing bowls. I had to do away with a rectangular transparent baking dish used for cooking lasagna, baked macaroni, etc. Oh, that made me hungry!
2) A camera. A D-SLR would make a better choice than a P&S as you can fully control the aperture and shutter speed with the previous than the latter. Though some P&S can offer some manual controls but will be very limiting. I used my beloved Canon 1000D with its kit lens (as if I had other lenses). A zoom or macro lens would be great.
3) A flash. Since we'll be dealing with a small aperture to get a wide DOF and fast shutter speed to freeze the action which will result to a black photo without the use of a flash. A separate flash would be nice but my built-in flash has fairly done well in my opinion. You be the judge.
4) A tripod. Although it can be done without it but can be a great help if you had one. This will help you focus on the drips.
5) Water drops. Of course, how can we forget these. These are the things we are going to capture. I used a faucet so I'll have a continuous and controllable flow of drips.
So here are the steps I took:
Step 1. Setup the container on the kitchen sink below the faucet making sure that the drips will hit the center of the container to get a wide area of coverage.
Step 2. Fill the container up to it's brim just a little before overflowing. After this, try to make the faucet just drip and check where it drips and then just adjust the container where you want the drops to fall.
Step 3. Setup your camera on a tripod in front of the container and pre-focus on where the water drops are falling. Manual focusing will help you better in accomplishing this. As a side note, I would like to share a tip on how to pre-focus on the site where the drops are falling. I set my camera to auto focus and use a chopstick tip and place it where the drops will be hitting the water and focus on that tip. After focusing, switch to manual focus. Camera settings I used are 55mm (that's my max for the kit lens), f20 and 1/200 sec. Try and experiment with other values. Important thing to consider: small aperture and fast shutter speed. Don't forget to pop-up your flash. If you can use some other source of light, I think it will help.
Step 4. At first, I tried using continuous shots but end up with lots of flat water. Yes, it meant that I was not able to capture a single drop of water. Then I tuned myself to pressing the shutter when the a water drop is about to fall. It's timing. Yeah, right! It's is about timing also when it comes to water drop photography. By the way, a remote trigger would've help also to avoid those camera shake and made some blur in photos.
Anyway, enough talk and let's see some results with what I only have. I'm forced to do just with what I have. Here's the larger version of the thumbnails above.
Exhibit A: Air Bubble Exhibit B: Dancing Couple
 Exhibit C: Splat!
So was it hard or easy? Well, I leave that for you to try! Cheers!